
Features
What SessionHUD does, in the order an operator usually meets it. Settings for each control are on the Settings page.
Take number
Pro Tools does not tell other apps which take is recording. SessionHUD reads it from the name of the audio file Pro Tools creates, and every output shows that number.
A dash when it is unknown
If SessionHUD cannot tell the take, the outputs show a dash. The usual cause is the first take after Disk Allocation points a track at an empty folder, which SessionHUD cannot see until Pro Tools puts a file in it. Once that take stops, the number appears and every take after it reads normally. A track on another drive is fine. Diagnostics lists the watched folders.
Last take kept after stop
The last take stays on screen after you stop, so playing a take back does not blank its number. While recording, an unknown take still shows a dash rather than the previous number.
Arming a different track, or renaming the armed track, starts over: the take number becomes that track’s last take in the record folder, or a dash if it has none, and elapsed clears with it. Disarming every track keeps the number, so you can play takes back. Before anything is recorded, the track field names the armed track.

Reading the record folder
When you open a session, SessionHUD shows the highest-numbered take already in the armed track’s record folder, or a dash if there is none, never take 1. It reads the folder only while stopped, and always: there is nothing to turn on.
Play does not advance the take
QuickPunch and TrackPunch create the next take’s file as soon as you press Play. SessionHUD only shows a new number once Pro Tools is actually recording, and punching in and out on one roll keeps the same number.
A canceled take
When ⌘. (Command-period) discards a take, the transport reads DEL and the number goes back to the previous take, or to a dash if that file is gone too.
Several armed tracks
Each track numbers its own takes. With more than one armed, a Track menu appears beside the take on the bottom row of the Designer, and Take number from track in the status menu.
The menu starts with four rules, then the armed tracks. A rule follows whichever track it picks: Top armed track or Bottom armed track in the Edit window, or the First track armed (the default) or Last track armed. Tracks already armed when SessionHUD connects to Pro Tools count in track order, top first, and with First track armed, arming another track later doesn’t change the take number. The menu names the track a rule picked, as in Bottom (Vox B), the rule in a word, and Diagnostics marks the take number a best guess. Pick a track by name to keep to that track; while it’s disarmed, the rule ticked above it is followed. The outputs and the take sheet all use the same choice.
Loop record
A loop-record pass is one take.
Elapsed time
Counts from the moment the take file appears, checked against the audio reaching disk. It freezes when you stop and restarts with the next pass.
The four outputs
All four outputs start off; turn on the ones you want with the buttons at the bottom of the Designer. The API behind the browser viewer answers on this Mac from launch, so you can wire Companion or OBS once.

HUD Window
A floating panel over Pro Tools. Drag it anywhere and it stays there. Its power button’s menu has Click-through, Show only while recording and Always on top, which you turn off for the panel to appear in a video app’s window picker (see Power buttons).
Full-Screen Display
A layout filling one chosen display, for a booth or client monitor. Full-Screen has its own layouts, composed to be read from across a room. The first time you turn it on, it asks which display to use. SessionHUD remembers that monitor through sleep, unplugging and restarts; if it’s missing, Full-Screen shows nothing and says why rather than using the wrong screen. Its power button’s menu picks the display and has Show only while recording.
The display never blocks your mouse: clicks go through it, and it steps behind SessionHUD’s own windows whenever you switch to SessionHUD. To turn it off fast, use the SessionHUD icon in the menu bar or right-click SessionHUD in the Dock, which work whatever app is in front, or press ⇧⌘F (Outputs ▸ Turn Off Full-Screen Now) with SessionHUD in front.
A layout fills the display by default. Place the Block… under the canvas puts it anywhere on the display instead (a lower third, say), and Fill Full-Screen Display puts it back.
Browser Viewer
A local page a producer opens on a laptop or iPad. The page is off until you press the Browser power button; the API it shares a port with answers from launch, which is what OBS, Companion and a tally read. Every client reads the same thing: take, transport, timecode, the session fields and the talent and client names you type in Session Controls.
While the Browser button is on, the page and the API are reachable from your local network; while it is off, the API answers on this Mac only. macOS may ask to allow incoming connections the first time you press it. To keep both on this Mac, set Reachable from to This Mac only in Settings ▸ Browser & API. There is no pairing code and no password: anyone on the network can open the page and read everything the API sends (take, transport, session and track names, and the talent and client you type in Session Controls), whatever the layout shows.
The page and the API share one port, 7373 unless you change it. Settings ▸ Browser & API lists both addresses. There is no NDI, OSC or Stream Deck plug-in; Companion can drive a Stream Deck through the API. Routes, payloads and examples are in the API reference.
Virtual Camera
The HUD as a camera that Zoom, Teams, Meet, Webex or OBS can open. It sits over the live room from a camera on the Mac, or on a backdrop of its own. The first time you press the Camera button it installs the camera extension: allow it when macOS asks, and the camera comes on. The button reads Approve while macOS is waiting, and pressing it opens the right page of System Settings. The camera has its own designer and camera layouts, and a Standby picture for any app that has it open while it is off. Setup, layouts and the settings each video app needs are in the Virtual camera guide. To watch what it is sending without the Designer, open Camera Preview.
Sample values
While Pro Tools is not connected, the designer shows a sample recording pass; until Pro Tools first connects, so do the HUD Window, Full-Screen and camera, so you can judge a layout at real size. The browser page and API never do. After Pro Tools has connected once, outputs show only real values. A disconnect dims the last values (or shows dashes, if you chose Show Dashes). Turn this off with Show sample values until Pro Tools connects in General ▸ Reading an output.
Appearance
Color profile, typeface, border and background opacity are saved with each layout, so switching layouts switches the look with them, and an exported layout looks the same in the next room. Select Appearance at the top of the Elements list, or click an empty part of the canvas or press Escape, and the Inspector shows the layout’s look. Locking a layout doesn’t lock its look, so you can recolor a locked layout without unlocking it. The HUD Window’s size and Grow to fit long text stay with the window, whichever layout it shows, under their own heading. On the Virtual Camera, each HUD uses its layout’s look unless you give it one of its own in the Inspector. Appearance works during the evaluation too.

For text opacity, select the element and use Appearance ▸ Opacity. When an older layout has a saved Text opacity of 80%, the update sets each text element, including captions and Take Log, to 80%. You can then adjust them separately. Images keep their image opacity.
- Show border: a thin edge in the profile’s colors, on the HUD Window and on each HUD on the camera.

Included presets
The HUD window, the browser viewer and the full-screen display each ship with the presets below; Full-Screen has every one except Banner. Click one to put it on that output. Hover a row in the Layouts list for a one-line summary.
- Simple: a centered counter with take and transport.
- Normal: a take card with larger transport, track and elapsed.
- Detailed: the current take, transport and track beside the previous three takes and their selects and alts.
- Timecode: a wide post-production clock with frame rate and session context.
- Banner: a single line in a wide, shallow strip for the bottom of a picture. Not offered on Full-Screen, where Place the Block… puts any layout along the bottom of the display.
- Timer: elapsed take time as the headline, with take, track and transport.
- Talent: take number, transport and elapsed time, with the performer and role underneath when you enter them in Session Controls.
- Lamp: every output except the Virtual Camera. A large take number with a lamp in the corner (a dot while recording, a triangle while playing, a square when stopped, in the colors of the layout’s profile) and elapsed time beside it. It ships with Background follows transport on; recolor it in the Inspector.
- Clock & Take: every output except the Virtual Camera. The take with the time of day beside it, the transport above, and the track and date underneath: which take, and what time it is. It uses the 12-hour time; duplicate it and swap in another Date & Time value for 24-hour.
- Producer: take, transport, elapsed and track. Its footer shows time remaining and wrap time while the countdown is running and visible. To keep that information at the desk, choose a separate layout on the booth display and pin the camera HUD to its own layout. Browser viewers share the layout assigned to the Browser output.
- Take Log shows four recent takes on the HUD Window and Browser Viewer, or ten in a centered table on Full Screen. The columns show the take number and its selects and alts. The take being recorded has a border. Tags are off by default.

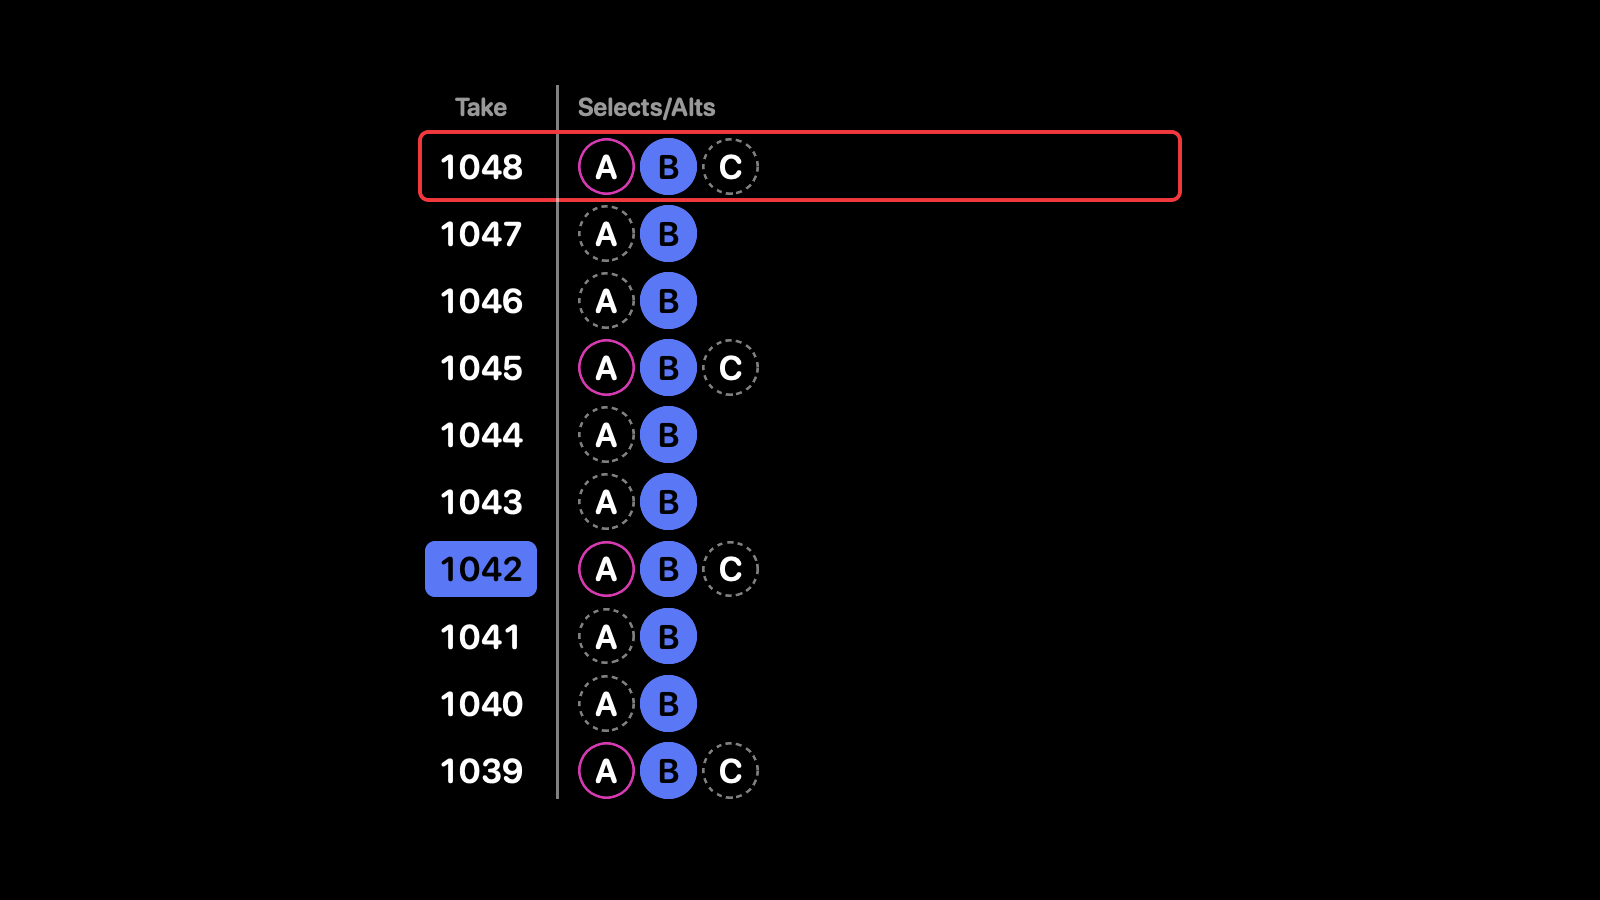
Example layouts
Technical Slate shows the file, session, timecode and session format. Download the panel example or full-screen example, then choose Import under the Designer’s layout list to add it as your own layout.
Right-click a layout and choose Review Layout Fit… to check it with sample values. Select an issue to see the two boxes or the edge of the frame. The dashed outline shows where Apply Move will put the element. Unlock a locked layout before applying a move. You can undo each move.
Locking and restoring
Every layout starts unlocked, presets included: select one and drag. Edit a preset in place (it keeps its name), or use Duplicate to keep the original and edit a copy. Once a layout is how you want it for a session, right-click it and choose Lock so a stray drag can’t change what’s on screen; Unlock to Edit changes it again. A locked layout shows a lock in the list and can’t be edited or renamed, and your own can’t be deleted while locked. Presets locked in an earlier version stay locked.
Once you have changed a preset, right-click ▸ Restore Default puts back what shipped without changing its lock, and ⌘Z undoes that. Delete works on a preset too, locked or not: it leaves that output’s list, with any changes you made to it. To get a deleted preset back, choose Restore Preset in the import/export menu under the list; it returns as shipped. The virtual camera’s presets, Standard and Backdrop, delete the same way, and come back from the restore menu beside the − button under its list.
Delete asks no question; ⌘Z brings the layout back. An output showing a deleted preset moves to the first layout left in its list; one showing your own deleted layout goes to Normal.

- Lock
- Right-click menu: Restore Default joins it once a preset has been changed.
Changing an output that is on
While an output is on, the canvas is a preview. Click another layout, or move, add or restyle anything on the one showing, and the canvas changes while the output keeps showing what it showed. Your changes are saved as you make them. A band above the canvas says the output is still showing its layout as it was, with two buttons:
- Update, for example Update Virtual Camera, sends what the canvas shows to the output.
- Revert puts the canvas back to what the output is showing. Undo brings your changes back.
The layout list says the same: the layout on the canvas has a Use button, which does what Update does, and the layout the output still shows is marked Live. With the list selected, Space is Use, and Esc goes back to the layout that is live.
Only the design waits. The take number, timecode and transport keep updating on the output as always. An output that is off takes changes straight away, and a layout picked from a power button’s menu or from the menu bar goes out straight away too.
The virtual camera draws HUD Window layouts, so a change on the HUD Window’s canvas can be held on the camera as well. The band then names both, and Update Both sends the change to both. Any output that is waiting has a pause mark beside it in the Outputs column, wherever you are in the Designer; click it to see its band. While the camera waits, its canvas draws your changes over the room the camera sees.
If you quit while an output is waiting, it shows your saved changes the next time SessionHUD opens. To send every change as you make it, turn off Hold changes until Update in Settings ▸ General.
Earlier versions
There is no Save command: every change to a layout is saved as you make it. Before each stretch of editing, SessionHUD also keeps the layout as it was, so you can go back further than Undo. A stretch starts with your first change after opening the layout, or after ten minutes without one. Ten versions are kept for each layout, the oldest dropped first; a rename or a lock is not a new version.
To go back, right-click the layout in the list and choose a time under Restore Version. Its elements and its look come back as one step, so Undo takes the restore back; its name and lock stay as they are. What was on the canvas becomes a version too. On an output that is on, a restored version waits for Update like any other change. Camera layouts keep versions the same way. Versions stay on this Mac: exporting a layout never includes them, and they are removed the next time SessionHUD opens after the layout is deleted.
Changing layouts on a live output
Clicking a row opens that layout. With held changes on (the default), an output that is on keeps showing its layout until you click Update. With them off, a click puts the layout on the output straight away, and moving through the list with the arrow keys while the output is on only previews: a miniature opens above the highlighted row, the row on screen is marked Live, and nothing reaches the screen until you press Space or the row’s Use button. Esc goes back to the layout that is live.
Each output row at the top of the column carries a small light that matches its power button.
Layout designer license required
During the evaluation each output, the virtual camera included, has an Evaluation Layout at the top of its list, so you can try everything below on a real screen. It starts blank. The virtual camera’s starts as Standard, the banner solid across the top of the room. To start from a preset instead, right-click it (or use the button above the Inspector) and choose Duplicate to Evaluation Layout: the preset’s arrangement replaces what is in the Evaluation Layout, and its Appearance (on the camera, its background) stays as you set it. Undo brings back what was there, and Clear on its right-click empties it (on the camera, Reset to Standard). On the camera’s Standard preset you can also change the HUD’s Appearance (profile, typeface, border and opacity), and it stays when you enter a serial. The presets themselves are read-only apart from Appearance. You can pick them, recolor them and export them. New layouts, Duplicate, importing a layout and adding a logo need a license, and a logo isn’t drawn during the evaluation. Layouts you made with a license, and changes made to a preset, stay hidden, not deleted, until you activate a serial. Then the Evaluation Layout is one of your layouts like any other.
A license unlocks the rest: edit a preset, or make as many layouts as you need, then drag elements, change their text, set when they show, their color and opacity, and add a studio logo. Layouts are files you can export and import between rooms, and each one belongs to one output.
The Elements list is the layer order, front-most first; drag to reorder. Clicking the same spot on the canvas again selects the element underneath.
Building a layout
- + under the Elements list opens a menu of what you
can add, and each choice arrives with its size, color and width already set for the
layout it lands on:
- Blank: a text box for your own words and any live values, ready to type in. Label is the same at caption size.
- Take, Transport and the other groups: the same values, in the same order, as Insert Data, each one its own element.
- Special: Transport Lamp, a square, triangle or dot in the transport’s color that hides when the transport is unknown, and Take Log.
- Image…: a studio logo (license required).
- Take Log draws the newest takes on the current take sheet, one to a row and newest first, so someone who missed a take being called can read it. Each row looks as it does on the sheet, in the sheet’s colors: a filled circle is a select, a ring an alt, a slash struck, and a dashed circle is not marked yet. It moves and resizes as one element. In the Inspector, choose how many rows, up to ten, whether the current take gets one, whether tags show, whether numbers are padded, whether an unmarked take number gets a dashed outline, whether the take being recorded gets a border, as it does on the sheet, whether a line separates the numbers from the letters, and whether Column headers name the columns, in your own words if you like. Drag its corner to set its width and how large its rows are: it stays inside the frame on every output. When a take has more letters than fit, the middle ones become an ellipsis and every select and alt stays, and when a frame is too short for its rows the oldest take goes first. A color that would disappear against the output’s background is drawn in the element’s own color. Hidden rows stay off it, and notes and your own columns never reach it. With nothing on the sheet it draws a dash. Select letters, Alt letters, Take letters and Take tags are the same marks as text for the take on screen alone, under Take: ● is a select, ○ an alt and × struck. They show a dash when the sheet has no row for that take, for instance when it is logging another track. The virtual camera has a Take Log card, which is the way to show it to people on a video call.
- − or Delete removes the selected element.
- Size runs from 8 to 400 pt, up to what fits in the frame, and each element has its own Opacity.
- Keep fixed as text changes sets the side that stays put when a value gets longer: Left edge, Center or Right edge.
- Drag an element on the canvas to move it. Every other element’s border shows while you drag, and it snaps to their edges and centers and to the frame’s. Elements can touch but not overlap, counting only the height of the text you can see, so a caption can sit close over a large number: it stops at a neighbour, and gets past once the pointer does. Hold ⌥ to place it freely, overlapping if you want. Two elements with opposite Transport rules may share a spot, since they never show together. Arrow keys move the selected element one grid step, and stop on any edge or center a drag would snap to on the way, so a few presses can center one element exactly on another; the line it lined up on shows for a moment. With ⌥ they move one point and pass those lines. Either way they stop at a neighbour.
- ⇧-click elements on the canvas to select more than one, and ⇧-click one again to take it out; ⌘- and ⇧-click do the same in the Elements list. Drag any of them, or use the arrow keys, and they move together, snapping and stopping as one element does; Delete removes them all. The Inspector edits one element at a time, so click one to change it.
- Grid under the canvas (4, 8, 16 or 32 pt) sets the arrow-key step and the lines on the canvas.
- W and H set the layout’s frame; Fit to Content shrinks it to the elements without moving them.
- Undo and Redo sit under the canvas (⌘Z, ⇧⌘Z), beside the button that opens the canvas in a larger window.
- Right-click an element in the Elements list for Bring to Front, Bring Forward, Send Backward, Send to Back and Remove.
- File ▸ New Layout (⌘N) and Duplicate Layout (⌘D). Rename a layout from its right-click menu or File ▸ Rename Layout.
Text and live values
An element showing one live value has a Data menu in the Inspector: choose another value and it changes in place, keeping its position, size and color. Customize… swaps the menu for the text box below, so you can add words or more values to it. An element that holds only one value shows the menu again the next time you select it.
In the text box, type your own words and use Insert Data to drop in live values: take, transport, timecode, the date and time, session format, armed tracks and your Metadata fields. The menu groups them by kind; point at a group to see its values, each with its current reading.
With Advanced template on, the same values appear as codes you can type:
- Take:
{take}(03),{takeNumber}(3),{track}the recording track,{takeFile}the take file name - Transport:
{transport}status,{transportSymbol}the same as a square, triangle or dot,{recordMode}record mode - Timecode:
{timecode},{elapsed}elapsed time,{sessionStart}session start time,{timelineIn}selection start - Date & Time: the time of day on this Mac, as
{time24}(14:32),{time24Seconds}(14:32:07),{time12}(2:32 PM),{time12Seconds}(2:32:07 PM); and the date, as{date}(Oct 20, 2026),{dateShort}(10/20/2026),{dateLong}(Tuesday, October 20, 2026),{dateISO}(2026-10-20),{weekday}(Tuesday). The four times keep the hour style you pick whatever your Mac is set to; the dates follow your Mac’s region, so the day and month come in the order you’re used to. These work with Pro Tools closed. - Session:
{session}name,{sampleRate},{bitDepth},{audioFormat},{timecodeRate}timecode frame rate - Tracks:
{armed}armed track names,{armedCount}how many are armed - Metadata:
{talent},{role},{client},{project},{engineer},{note}, and{countdown}with{countdownEnd}, which show only while a countdown is running (below)

- Insert Data: adds a live value to the text as a badge. Each value shows what it reads right now.
- Advanced template: shows the same text with
{placeholders}you can type. - Long text: Fixed size keeps the box as it is; Shrink to fit, Smallest size and Show decide what happens to text wider than it. See Long text.
- Transport: Always, or only while recording, playing (recording counts as playing) or stopped.
- Conditions: Only with a session open; Hide when nothing is known. Every ticked condition must be true.
Color and images
Text uses the layout’s profile color unless you pick another in Text color, or choose Custom color… and type a hex color.
Add a studio logo with + ▸ Image… under the Elements list (license required): PNG, JPEG, SVG and other common formats. It is saved inside the layout, so it travels with an export.
Long text
Turn on Fixed size to stop an element following its text: its box stays the size it is now, so a longer value on the day cannot run into its neighbour. Without it, the canvas can only keep elements apart at the values it is showing. The corner handle then sets width and type size separately. Text wider than the box shrinks first if Shrink to fit is on, down to Smallest size (Option-click to reset: 11 pt, or half the size for text 48 pt and larger), then is cut with an ellipsis. Show picks which part survives: Beginning, or End. Track and file names keep their end by default, so a take file’s number stays visible. Every preset shrinks to 11 pt.
Session Controls
Session Controls is a small window to keep open beside Pro Tools while you work. Open it from the Session Controls button beside the SessionHUD logo at the top of the Designer, from File ▸ Session Controls…, or from Session Controls… in the SessionHUD menu bar icon’s menu. It holds the names you type for the session, a countdown, and a power button for each output across the top, which work exactly like the ones in the Designer. Under the power buttons, Track names the armed track and the take number the outputs show; with more than one armed it picks which one counts, as it does in the Designer. Click Metadata or Countdown to fold either to one line: folded, Metadata shows the talent and client and Countdown shows the time left. To leave out what you don’t use, see Settings ▸ Session Controls.
The buttons beside the logo open SessionHUD’s other windows without the Designer. The brush shows and hides the Designer, where layouts are designed; the list shows and hides the take sheet; and the picture-in-picture button shows and hides Camera Preview, what the virtual camera is sending. Each is lit while its window is on screen, and a window hidden behind another comes forward rather than closing. Your outputs keep running either way. The pin keeps Session Controls above Pro Tools and every other app.
The same New Take and Stop as on the take sheet sit under the take number, unless you untick Session Controls under New Take and Stop’s Show in in Settings ▸ Commands. They do not need a take sheet to be open. A press never changes which app has the keyboard, so a press from Pro Tools leaves it the spacebar, and a press while you are working in SessionHUD leaves you there, because a key meant for SessionHUD could otherwise become a Pro Tools command. Moving this window brings SessionHUD forward, as moving any window does, so click Pro Tools before you use its spacebar.
With Session Controls ticked under Play Last Take’s Show in, in Settings ▸ Commands, Play Last Take sits under them, and it does not need a take sheet to be open.
When Play Last Take is set to Copy to a track, then play, a small copy button (two pages) sits at the right end of Play Last Take’s line. It is Copy Takes on Stop, the same switch as Copy takes automatically when the transport stops, so you can turn the copying on and off between takes without opening Settings. Filled and green, it is on; an outline, it is off. Hover over it for a reminder, though macOS shows that only while SessionHUD is the active app. Like New Take, clicking it leaves Pro Tools in front with its spacebar. Turn it off and any take still waiting to be copied, such as the last one while the next is recording, isn’t copied. A copy already under way finishes.
With Session Controls ticked under Letters’ Show in, in Settings ▸ Commands, a Letters card under the transport adds letters without the take sheet in front. It is one line, labelled Letters:, with the take sheet’s own − + pill beside the label: − removes the take’s last letter and + adds the next. After it are the letters of the take being recorded, or of the last take when Pro Tools is stopped, marked as on the sheet: click for a select, right-click for an alt, Command-click to strike one out. The take is the one on the track row above it. Each press leaves Pro Tools in front with its spacebar. They are the take sheet’s own letters, so a letter added here during a take is marked in Pro Tools the moment you press it when the sheet adds markers, and the take sheet’s Undo takes it back. The card is hidden while the take sheet hides its Letters column.
A line under the take number says what Pro Tools' transport is doing and the record mode: Recording in red, Playing in green, Stopped in grey, following the same rules as your outputs. It also says Pro Tools not running, No session open or Connecting to Pro Tools, and shows a dash if Pro Tools has stopped reporting. You can turn it off in Settings ▸ Session Controls, without affecting New Take and Stop.
Under Metadata, talent, role, client, project, engineer and note are typed by you. They are available whether or not Pro Tools is connected, and Talent uses the performer and role. SessionHUD never invents them. Clear empties every field at once between sessions; Edit ▸ Undo brings them back.
Countdown, under the fields, runs to the end of a break or the
session. Choose Until a time and set when it ends, or For a
length and set the hours and minutes, then press Start. Choosing a
time or a length doesn’t start anything. {countdown} shows the time left,
such as 12:05 or 1:02:03, and {countdownEnd} shows when it ends; the card shows
both while it runs. Hide takes it off every output and keeps it counting, and
Show puts it back. Stop ends it, and
Restart runs it again from now with the time or length set. A layout element that shows the
countdown appears only while one is running and not hidden, label and all. A time earlier than
now means tomorrow. Only a click starts it: changing the time or length of a running countdown
takes effect when you press Restart, and it is always stopped when
SessionHUD opens. Once it reaches 0:00 it stays there until you stop or restart it.
Clear stops it and remembers how you set it.

Take sheet
The take sheet writes down every record pass as it happens (take number, start time, timecode, length, track and file), with your selects, alts, letters, tags, lines and notes beside each take, and exports it as a PDF, CSV or Excel file. Open it with File ▸ Take Sheet… (⌥⌘T). It has a page of its own: Take sheet.
MTC timecode
In Pro Tools, open Setup ▸ Peripherals, choose the Synchronization tab, and set MTC Generator Port to SessionHUD MTC, listed under Predefined. SessionHUD must be running for the port to be listed.
Then turn on GEN MTC in Pro Tools’ Synchronization controls, in the Transport window or the Edit window toolbar. With it off, Pro Tools sends no timecode even with the port set, and SessionHUD falls back to working the timecode out itself. Press play, and Diagnostics shows the frames as they arrive. Until any MTC has arrived, a Timecode element’s Inspector in the Designer repeats these steps in a line.

- Synchronization
- MTC Generator Port: SessionHUD MTC, under Predefined. Leave MTC Reader Port as it is.
Without MTC, the timecode still follows the transport, whether or not a track is armed. Playing or recording, it counts up from the start of the timeline selection at the speed the transport is running. Stopped, it stays where the transport stopped until it rolls again, as it does with MTC. Fast-forward, rewind and scrub show a dash. Diagnostics calls these positions a best guess. When frames stop arriving, the last known timecode dims rather than looking live. SessionHUD never generates or echoes timecode.
Next: Take sheet · Settings · Support.